This page was last updated at 11:00 on Thursday 25th March.
This is an archive of the original steps you could take to temporarily fix the problem where you had a Windows 10 error every time you printed which said “Your device ran into a problem and needs to restart. We’re just collecting some error info, and then we’ll restart for you” with the extra detail “Stop code: APC_INDEX_MISMATCH failed: win32kfull.sys”
You do not need to follow these steps now. Refer back to this page to get the latest advice and update.
The information below is simply an archive, and was the best advice available between 10-16 March 2021. Microsoft released their new update on 16 March 2021 which renders these steps redundant.
What is the problem?
On 9th March 2021 there was an update to Windows 10 which conflicts with the way your PC talks to your Kyocera Ecosys laser printer – and when you open the File -> Print window, or when you actually try to print anything (from Google Chrome, Microsoft Word, Outlook, Excel, or any other program) your PC crashes with a “blue screen of death” (BSOD) and turns itself off or reboots.
The blue screen error message says “Your device ran into a problem and needs to restart. We’re just collecting some error info, and then we’ll restart for you” and says that win32kfull.sys failed with a stop code of APC_INDEX_MISMATCH… but all that really matters is that you try to print, your PC crashes, you see a blue screen, your PC restarts… and nothing got printed!
How can we fix it? (Original Fix – Part 1 – Removing the problem update)
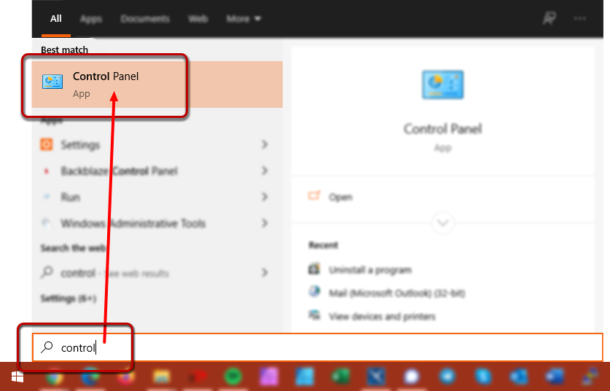
- Open Control Panel
To open Control Panel on a Windows 10 PC, you just press the Windows key on your keyboard (bottom left corner – between Control and Alt) and then type Control. Don’t worry about where to type it – just type it. So you press the Windows flag key, then type Control – you’ll see the start menu has opened, and Control Panel is showing at the top of it: just click on that.
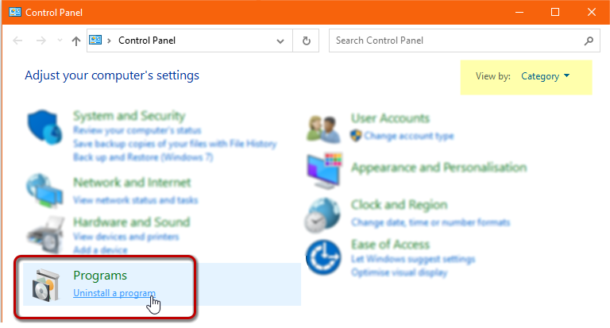
- Click Uninstall a Program
If you don’t see a screen like this one, yours will say View by: Icons at the top right corner. Click the menu and select View by: Category and then you’ll see the same screen as this – just click on Uninstall a Program
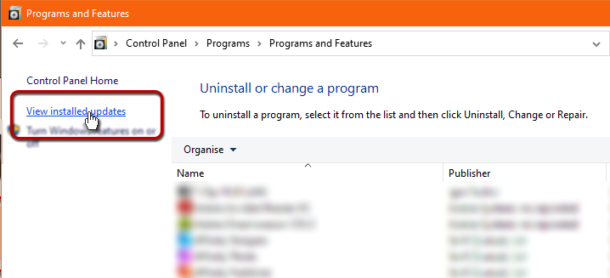
- Click View installed updates
Ignore the list of programs that you have installed – we’re only after the link in the left-hand menu – click on View installed updates
- Select “Security Update for “Microsoft Windows (KB5000802)” and click Uninstall
You’ll see a long list with many different updates: see that they are broken up into groups… find the one titled Microsoft Windows (the yellow-highlighted bit in the screenshot below).Your computer will have different groups from this screenshot, but once you’ve found your Microsoft Windows section, look for the line ending (KB5000802) and click on it.Finally, click Uninstall at the top of the window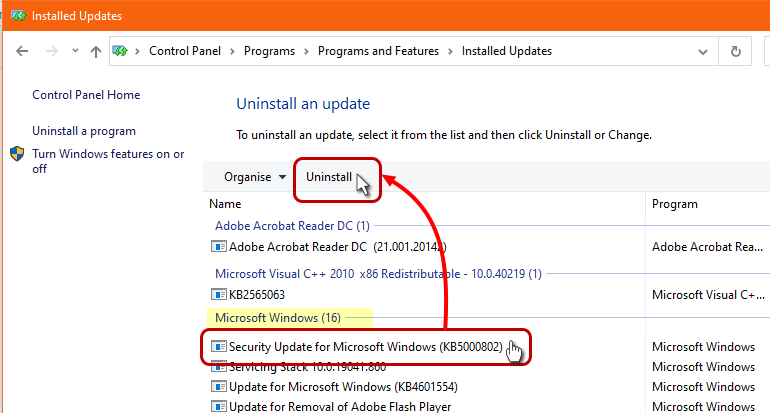
- Click Yes, then after waiting, click Restart Now
When prompted if you are sure that you want to uninstall the update, click YesThe progress bar on the following screen can take some time – more than a minute and maybe as long as twenty minutes. Leave it to run, don’t press Cancel, it’ll get there in the endOnce it has finished, click Restart Now. Your PC will then restart – it’ll take some time, much longer than normal, but it will restart and take you back into Windows after a little wait.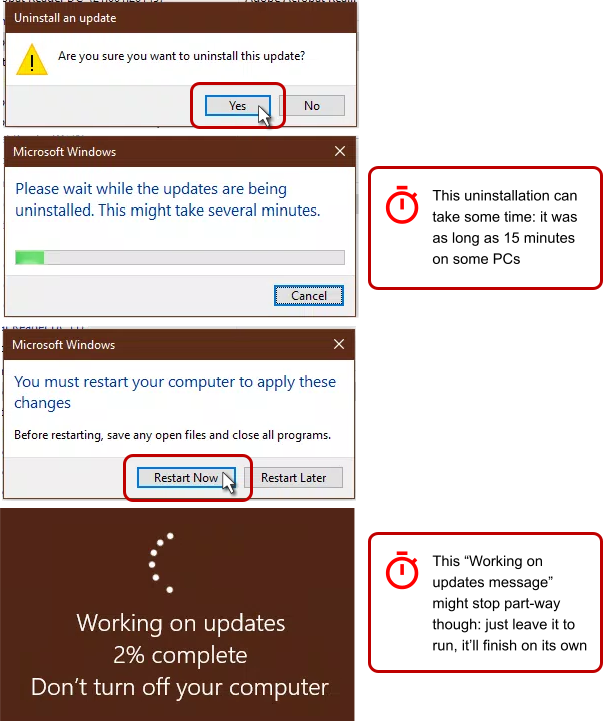
- You’re done
That’s it – you have removed the update. You’ll be able to print again.The update might install itself again though – so you can follow the additional steps below to stop that from happening…
Pause Windows Updates to stop the same update from being installed again (Original Fix – Part 2)
Windows 10 will let you uninstall the problematic fix today, but it could well sneak back round tomorrow and install it again. I am recommending that you pause the updates on your computer for a week. This way, the problem can’t come back straight away, you’ll be able to get on with your work for a week, and hopefully by this time next week, Microsoft will have sorted out the problem, fixed the update, and when your PC checks for updates next time, will get only updates that actually work.
Follow these steps to temporarily pause Windows Updates for a week:
- Open Windows Update
To open Windows Update, you just press the Windows key on your keyboard (bottom left corner – between Control and Alt) and then type Update.Don’t worry about where to type it – just type it. So you press the Windows flag key, then type Update – you’ll see the start menu has opened, and Check for updates is showing at the top of it: just click on that.

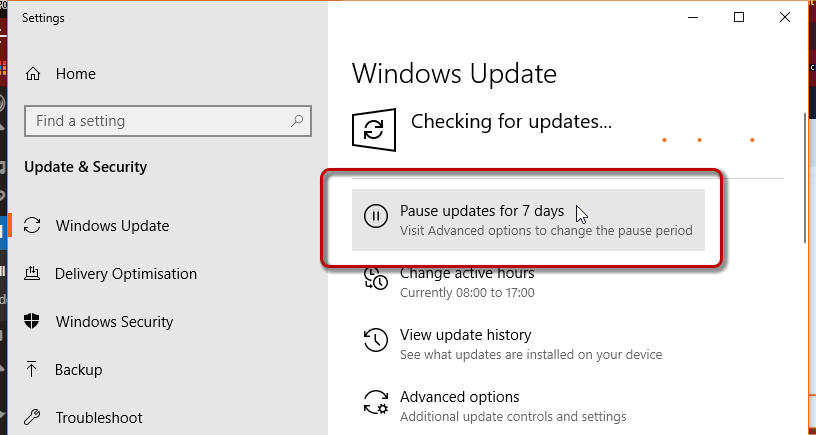
- Click Pause updates for 7 days
Once this Windows Update screen is open, click the Pause updates for 7 days button as below:
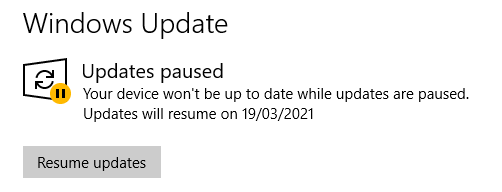
- Updates are paused
Once you see this on your own PC, you’re done: you’ve bought a week’s worth of time where you can print and work normally, and Microsoft have some time to sort out the update before your computer checks and installs it again
What do Microsoft say about the problem?
Whenever Microsoft publish any updates for Windows 10 they always post details of what they’re fixing, why, and any conflicts. The bulletin for this update is here.
Acknowledging the problem by saying “After installing this update, you might receive an APC_INDEX_MISMATCH error with a blue screen when attempting to print to certain printers in some apps”, they provided a subsequent new update after a few days. It’s detailed on the main page which shows how to install it and to check that it’s installed properly.
Having used this new additional update on my own computers and on a couple of customers’ PCs already, I am confident that it does fix the problem completely. There is no ongoing need to keep Windows Updates paused.
